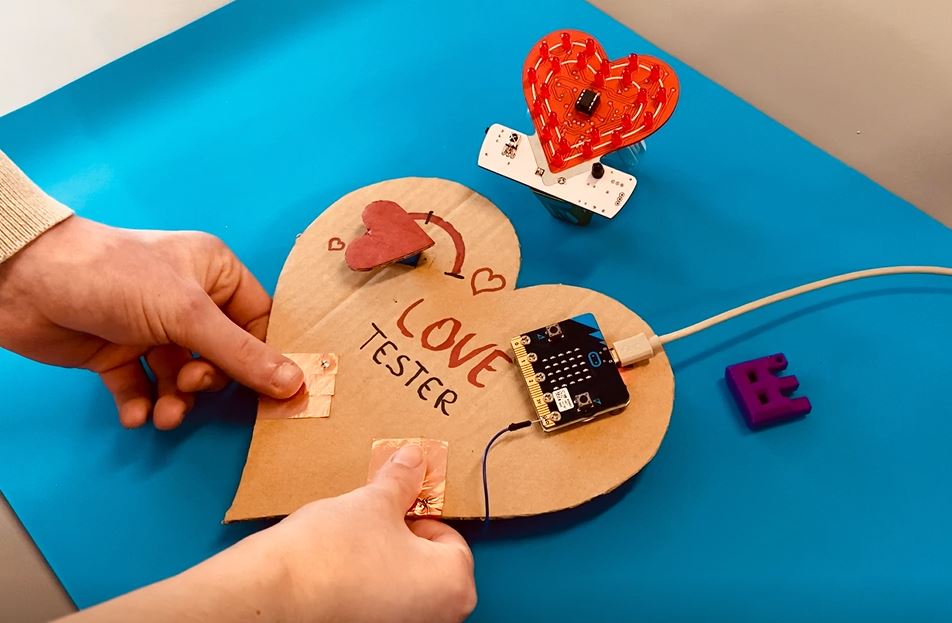
Happy Valentine’s day! If you are looking for the right person in your life, we’ve made a Micro:Bit love tester to help you out!
This project uses a Micro:Bit and a servo motor to determine how much you love each other. Don’t worry, it is actually completely random so you don’t have to be afraid. Here’s how it works: you and your potential loved one must hold hands, and with your other hand or finger you have to touch the touchpads shortly at the same time. The servo motor will display the love percentage, and the Micro:Bit will display a matching emoticon. We’ve mounted the electronics on a cardboard in the shape of a heart to make it a little more crafty. Enjoy this loveable project!
Materials needed for making a Micro:Bit love tester
Ingredients:
- Micrbo:Bit starterkit
- power shield for Micro:Bit
- 9G servo motor
- conductive tape or tinfoil or conductive wire
- piece of cardboard (25CM X 20CM)
- breadboard wire
- 8x M3x8 bolts
- 2x cr2025 batteries
Tools:
- PC (to upload the MicroBit code)
- USB A – Micro USB
- soldering iron
- solder
- scissors/ box cutter


 - 10 pcs")
Programming the development board of the Micro:Bit love tester
Dev board: Micro:Bit
Difficulty: easy
Preparations:
Checking the MicroBit MakeCode sketch: go to the MicroBit code editor (https://makecode.microbit.org/) and start a new project.

Download the “microbit_heart_code.zip” here and drag the file into the editor.

Now you should see the code for the love meter, below is some explanation.

Prepping the connections
Connection Table Servo motor
| MINI ANALOG SERVO – 9 G | MicroBit |
|---|---|
| G | GND |
| V | 5V |
| S | P2 |
Uploading the program
You’re now ready to upload the code! Connect the Micro:Bit to your PC and drag the “MicroBit_Lovetester.hex” to the Micro:Bit removable disk, as shown in the picture below. The LED on the Micro:Bit will Flash quickly until the program is uploaded.

Assembling the electronics
Overview of the Ingredients:

Step 1: Cut out a heart shape of about 25 x 20 cm, you can use this template.

Step 2: Place the template onto the cardboard and trace it with a pencil. The semicircle in the left top of the heart will display the love percentage with the servo. Do not cut it out of the cardboard, but trace it with a pencil.

Then cut it out with a box cutter

Step 3: Place the POWER:BIT SHIELD on the cardboard and trace the 3 mounting holes with a pencil.

Then cut it out with a box cutter, also make a hole just above the shield. This will serve as a feed-trough for the cables.

Step 4: Now we will cut out the hole to mount the servo motor in, trace the shape of the servo with a pencil.

Then cut it out with a box cutter (we also colored the love percentage bar).

Step 5: Mount the servo in the hole you just made.

Step 6: Mount the servo arm. Make sure the servo is at its full left position.

Step 7: Feed the servo cable through the hole, as shown in the picture below.

Step 8: Stick some conductive tape at the side of the heart as shown in the picture below. Or use tinfoil. If you are using the conductive wire, you can sow it through the cardboard by using a thick needle.

Do the same on the other side.

Step 9: Mount the POWER:BIT SHIELD on the Micro:Bit.

Tighten the 5 M3x8 bolts.

Step 10: Connect the servo to the POWER:BIT SHIELD like in the picture below. Pay attention to the colors!

Step 11: Place 2 CR2025 batteries in the POWER:BIT SHIELD.

Step 12: Place the MicroBit with the POWER:BIT SHIELD on holes in the cardboard we’ve made earlier.

Then tighten it down with 3 M3x8 bolts.

Step 13: You should now be at this point:

POWERStep 14: Connect a wire to P1 of the:BIT SHIELD (last free pin).

Step 15: Pinch it through the cardboard….

Through the conductive tape.

Step 16: Solder the wire to the conductive tape so it stays put en makes a good connection.

Step 17: Solder another wire to the GND of the Micro:Bit.

Step 18: Pinch it through the cardboard and conductive tape on the other side of the heart. Solder the wire to the conductive tape……

Done! Now color, customize and pimp your love tester to your own taste! Be creative!
Use your USB cable to power up the Micro:Bit love tester if the batteries aren’t enough.